Creating an automated script to deploy an Azure DevTest Lab with virtual machines and Bastion enabled requires a structured approach. If you haven’t already, review existing Microsoft Azure help docs: Quickstart: Create a lab in Azure DevTest Labs using Terraform – Azure DevTest Labs | Microsoft Learn
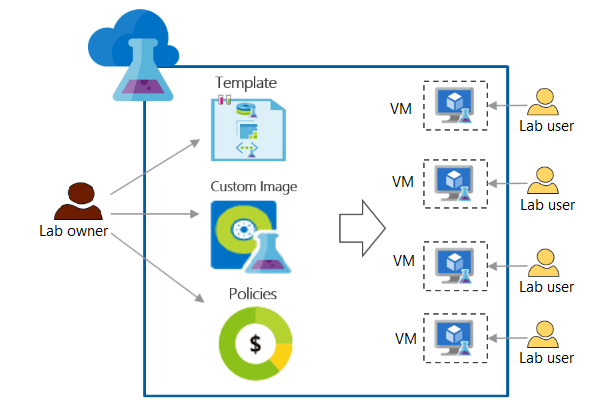
TecnetOne has a simple network diagram that describes this setup
Below are the best steps to start:
1. Define Your Requirements
Before scripting, figure out your parameters for the automation:
- Number and sizes of Virtual Machines (VMs)
- Image types (Windows, Linux, custom images)
- Network setup (VNet, Subnets)
- Bastion configuration
- Any artifacts (pre-installed tools) required for VMs
2. Choose a Scripting Language
My preference is using Terraform for the Infrastructure-as-Code (IaC) feel.
- Azure CLI (Shell or PowerShell)
- Azure PowerShell
- Terraform (if you prefer Infrastructure-as-Code)
- Azure Bicep (simplified ARM templates)
- ARM Templates (declarative JSON-based)
- Python SDK (for more dynamic logic)
For automation, Terraform or Bicep is recommended.
3. Set Up the Infrastructure as Code
Option 1: Terraform Approach
In this section, I’ll overview each prerequisite and configurations needed to deploy an Azure DevTest Lab setup with bastion enabled.
- Install Terraform in Azure Cloud Shell & Authenticate to Azure
- Create a Terraform Configuration File,
main.tf - Create the
outputs.tffile - Create a
variables.tffile - Create the Execution Plan
Before jump into the code, we need Terraform installed. Walk through Azure’s installation instructions.
A. Install Terraform in the Azure Cloud Shell & Authenticate to Azure
Follow the Azure Cloud Shell instructions in your Azure Portal or the shell script for your preferred OS. See options that OS Microsoft Azure provides. in your Azure Portal.


Notice in the below shell, we have some work to do to update our terminal. So update the shell and then continue with running the commands to login.

Alternatively, you can run a bash or powershell terminal locally. I’m running this on my Mac.
B. Initialize Terraform
terraform init --upgrade
C. Create a Terraform Configuration File (main.tf) (this is the Imperative Approach, where we define the end result first)
terraform {
  required_version = ">=0.12"
  required_providers {
    azurerm = {
      source  = "hashicorp/azurerm"
      version = "~>3.0"
    }
    random = {
      source  = "hashicorp/random"
      version = "~>3.0"
    }
  }
}

provider "azurerm" {
  features {}
}

resource "azurerm_resource_group" "devtestlab_rg" {
  name     = "devtestlab-rg"
  location = "East US"
}

resource "azurerm_dev_test_lab" "devtestlab" {
  name                = "my-devtest-lab"
  resource_group_name = azurerm_resource_group.devtestlab_rg.name
  location            = azurerm_resource_group.devtestlab_rg.location
}

resource "azurerm_dev_test_virtual_network" "vnet" {
  name                = "devtest-vnet"
  resource_group_name = azurerm_resource_group.devtestlab_rg.name
  location            = azurerm_resource_group.devtestlab_rg.location
  lab_name            = azurerm_dev_test_lab.devtestlab.name
  subnet {
    name       = "default"
    use_public_ip_address = false
  }
}

resource "azurerm_bastion_host" "bastion" {
  name                = "my-bastion"
  resource_group_name = azurerm_resource_group.devtestlab_rg.name
  location            = azurerm_resource_group.devtestlab_rg.location
  sku                 = "Standard"

  ip_configuration {
    name                 = "bastion-ipconfig"
    subnet_id            = azurerm_dev_test_virtual_network.vnet.subnet[0].id
    public_ip_address_id = azurerm_public_ip.bastion_ip.id
  }
}

resource "azurerm_dev_test_virtual_machine" "vm" {
  name                = "devtest-vm"
  lab_name            = azurerm_dev_test_lab.devtestlab.name
  resource_group_name = azurerm_resource_group.devtestlab_rg.name
  location            = azurerm_resource_group.devtestlab_rg.location
  size                = "Standard_D2s_v3"
  allow_claim         = true

  storage_os_disk {
    disk_size_gb = 127
    disk_type    = "Standard"
  }

  network_interface {
    use_public_ip_address = true
    subnet_id             = azurerm_dev_test_virtual_network.vnet.subnet[0].id
  }

  os_type   = "Windows"
  username  = "adminuser"
  password  = "YourSecurePassword123!"
}
D. Create a file called outputs.tf, which will store the results for the executed Terrform script above.
output "resource_group_name" {
  value = azurerm_resource_group.rg.name
}

output "lab_name" {
  value = azurerm_dev_test_lab.devtestlab.name
}

output "vm_name" {
  value = azurerm_dev_test_windows_virtual_machine.vm.name
}

output "password" {
  sensitive = true
  value     = local.password
}
E. Next, create a variables.tf file to hold all lab names, resource specs…etc.:
variable "resource_group_location" {
  type        = string
  default     = "eastus"
  description = "Location for all resources."
}

variable "resource_group_name_prefix" {
  type        = string
  default     = "rg"
  description = "Prefix of the resource group name that's combined with a random ID so name is unique in your Azure subscription."
}

variable "lab_name" {
  type        = string
  description = "My New Awesome DevTest Lab"
  default     = "AwesomeLab"
}

variable "vm_size" {
  type        = string
  description = "The size of the vm to be created."
  default     = "Standard_D4_v3"
}

variable "user_name" {
  type        = string
  description = "The username for the local account that will be created on the new vm."
  default     = "myuser"
}

variable "password" {
  type        = string
  description = "The password for the local account that will be created on the new vm."
  sensitive   = true
  default     = "MySuperSecretPasword123"
}
F. Create the Execution Plan
The Terraform plan command (terraform plan) creates an execution plan to preview your changes when testing your deployment script. In your directory, run this command to produce:
- Read the current state of your objects, making sure all is updated
- Compared current and previous state configurations
- Produces a set of change actions for improving your configuration
- The
-outparameter allows you to create the execution plan, but not actually run it
terraform plan -out main.tfplanOption 2: Azure CLI Declarative Approach (where we define each programmatic step)
A. Create a Resource Group
az group create --name devtestlab-rg --location eastusB. Create the DevTest Lab
az lab create --resource-group devtestlab-rg --name my-devtest-labC. Create a Virtual Network
az network vnet create --name devtest-vnet --resource-group devtestlab-rg --subnet-name defaultD. Deploy Bastion
az network public-ip create --name bastion-ip --resource-group devtestlab-rg --sku Standard az network bastion create --name my-bastion --resource-group devtestlab-rg --location eastus --public-ip-address bastion-ip --vnet-name devtest-vnetE. Deploy a VM
az lab vm create --lab-name my-devtest-lab --resource-group devtestlab-rg --name devtest-vm --image "Windows Server 2019 Datacenter" --size Standard_D2s_v3 --admin-username adminuser --admin-password "YourSecurePassword123!"4. Automate Deployment
To ensure repeatability for future uses:
- For Terraform, use CI/CD (GitHub Actions, Azure DevOps)
- For Azure CLI, create a Bash or PowerShell script
- For Bicep, use
az deployment group create --template-file main.bicep5. Verification
Check deployment via Azure Portal (portal.azure.com)
# List resources
az resource list --resource-group devtestlab-rg
Connect to the VM via Bastion
6. Cleanup (If Needed)
To delete the resources:
az group delete --name devtestlab-rg --yes --no-waitOr with Terraform:
terraform destroy -auto-approveConclusion
The best way depends on your preference. This post provided a base example of deploying Azure DevTest Labs using the imperative approach where we define the end result first:
- Terraform → If you want reusable infrastructure as code.
- Azure CLI → If you prefer command-line scripting.
- Bicep/ARM Templates → If you like declarative templates.